Hi!!
I know it's been ages, but I have been even more busy than usual, if you can believe that. Plus, I got really annoyed because Blogger wouldn't let me upload any pics, ugh!
Anyway, how is everyone? How was Thanksgiving (for those of you that celebrate that)? How is everyone's prep for Christmas coming along? How many of you are making gifts/decorations etc??
I think the last time I posted was at the very start of this month... Wow! So much has happened around here!
Just before that post B-man turned 1 and we had a smallish afternoon tea to celebrate. About a week later my assistant turned 3! I can't believe how fast the last year passed by! So to celebrate her birthday she decided (and reminded me of that decision for the last 8 months or so) that she was having a "princess party" with a princess tent...(WHAT!?!?) She's not even into princesses usually...more cars, trucks diggers and the like. Oh well, I spent the 2 weeks between birthdays preparing for a princess party. She wrote on invites and we posted them, that was pretty much the easiest thing to do. I went shopping one day with my awesomest sister and bought a bunch of bits and pieces for party bags and all that jazz. It was sorta fun to do, but I'm hoping I don't need to do it too often, it's pretty pricey when you add it all up.
In the couple of days leading up to the big event I was making party bags, cake pops, fruit skewers, choc-coated strawberries and of course a pink swirly star cake with sparkly sprinkles. There were a few more things to plan/make, like the tent. It worked out pretty well, all except for the weather on the day, it was freezing! Our poor little princesses were shivering for the party and we ended up moving inside my tiny and messy little lounge-room to finish up opening presents and giving out party bags.
So that was the party! The next day I was unusually motivated to do some gardening and ended up transplanting one of my 20ish-year-old Camellias to the opposite side of my garden, and it is heaps better there. I put it into an actual garden bed, as opposed to being on the lawn. Hubby's much happier now as it makes mowing heaps easier for him, especially on the ride-on.
Last week I went with my assistant and B-man to a sewing day where 5 of us and my assistant sewed some items to send to MAG, and on to Tanzania. It's always nice to be able to sew for others, except I was having a shocker of a day! I don't want to go into all of the details, but one of the things that happened involved my sewing machine...I tried my foot controller in my assistant's machine which I really didn't think through properly, and it burnt out the potentiometer (speed adjusty bit) inside my pedal. Oh man, BIG TEARS!!! I love my machine and use it ALL the time, EVERYDAY! I was SO SAD! Boo hoo! The next day Hubby and I looked around online for a replacement pedal, but there weren't many and they were all going to cost around $50-$100, not really what I can afford right now, so I decided to open it up and see what the little part inside looked like and whether I could see it too, so we found the little teeny weeny bit that was ruined and ordered a new one online for 45c (plus $4.50 postage) in America so I'm just waiting...and waiting...hopefully it will be fixed in the next week or so, I'm going a little crazy, which brings me to the next project...
A little background, we had termites in one of the posts on our verandah which hadn't been sealed properly when it was built 20-ish years ago. We knew they were in there, we've killed them before, but a couple of nights ago Hubby went out into the yard and there was a huge swarm of them coming out from the post. When I say huge I mean a good 6 meters of dense termite-y-ness. Yuck! So the only option was to jack up the verandah and the roof and take the post out. Seeing as it was already dark and all, it seemed much easier to just chop it off near the top with the chainsaw, so while everyone else in the street were just hopping into bed he was out there starting up some noise and then a fire to dispose of it...hahaha, I like to think our neighbours are used to the crazy shenanigans that go on at our place...if not, I'm really sorry if we disturbed you!!The next morning we got straight to the hardware store and bought a replacement post along with a bunch of other bits that we thought we should probably replace while we were doing it anyway, so we now have a whole stash of timber and screws plus a bunch of tools here ready to put together as our new verandah railing. A bit ambitious, I know, especially with the whole fam coming here for Christmas, but better to be ambitious than not get anything done at all, I think...hahaha
Anyway, I should probably go and attempt to do some of the work that needs to be done out there...hopefully I'll be back soon with pics of everthing. In the meantime, feel free to check out some of them HERE.
Have a great day/week/month...just in case I don't get back by then...

Showing posts with label Bags. Show all posts
Showing posts with label Bags. Show all posts
Monday, November 26, 2012
Sunday, September 2, 2012
Sewtember Day Two - Getting stuff done.

I spent today with my little family and I didn't get much time for sewing, so when it came to bed time for the kidlets I looked in my drawer of unfinished bits and found some cut pieces for a bag from around 9 years ago or more.
Before you check it all out, this is a bag which I put hours into designing so that it would be big enough for whatever and only used 1 pattern piece. I like things to be symmetrical, but I really don't like the idea of a seam along the length of the strap. I also wanted to it to be reversible and comfy, so it has a wide shoulder strap which can be made to the desired length (to hang up near your arm or across your torso diagonally). It's such a quick and easy bag to make too.
Because I was trying to do a quick project tonight I didn't cut out any lining for it, which is ok given that I'd cut the pieces out of curtain fabric. It's quite a sturdy bag. I used some left over bias binding which I made for a Tashi outfit for my nephew recently to cover the raw edges around the top of the bag. It actually worked pretty well and I might use the same process again.
Anyway, here is the bag being made, it's really really quick!

These are the 2 pieces that were in my UFO drawer.
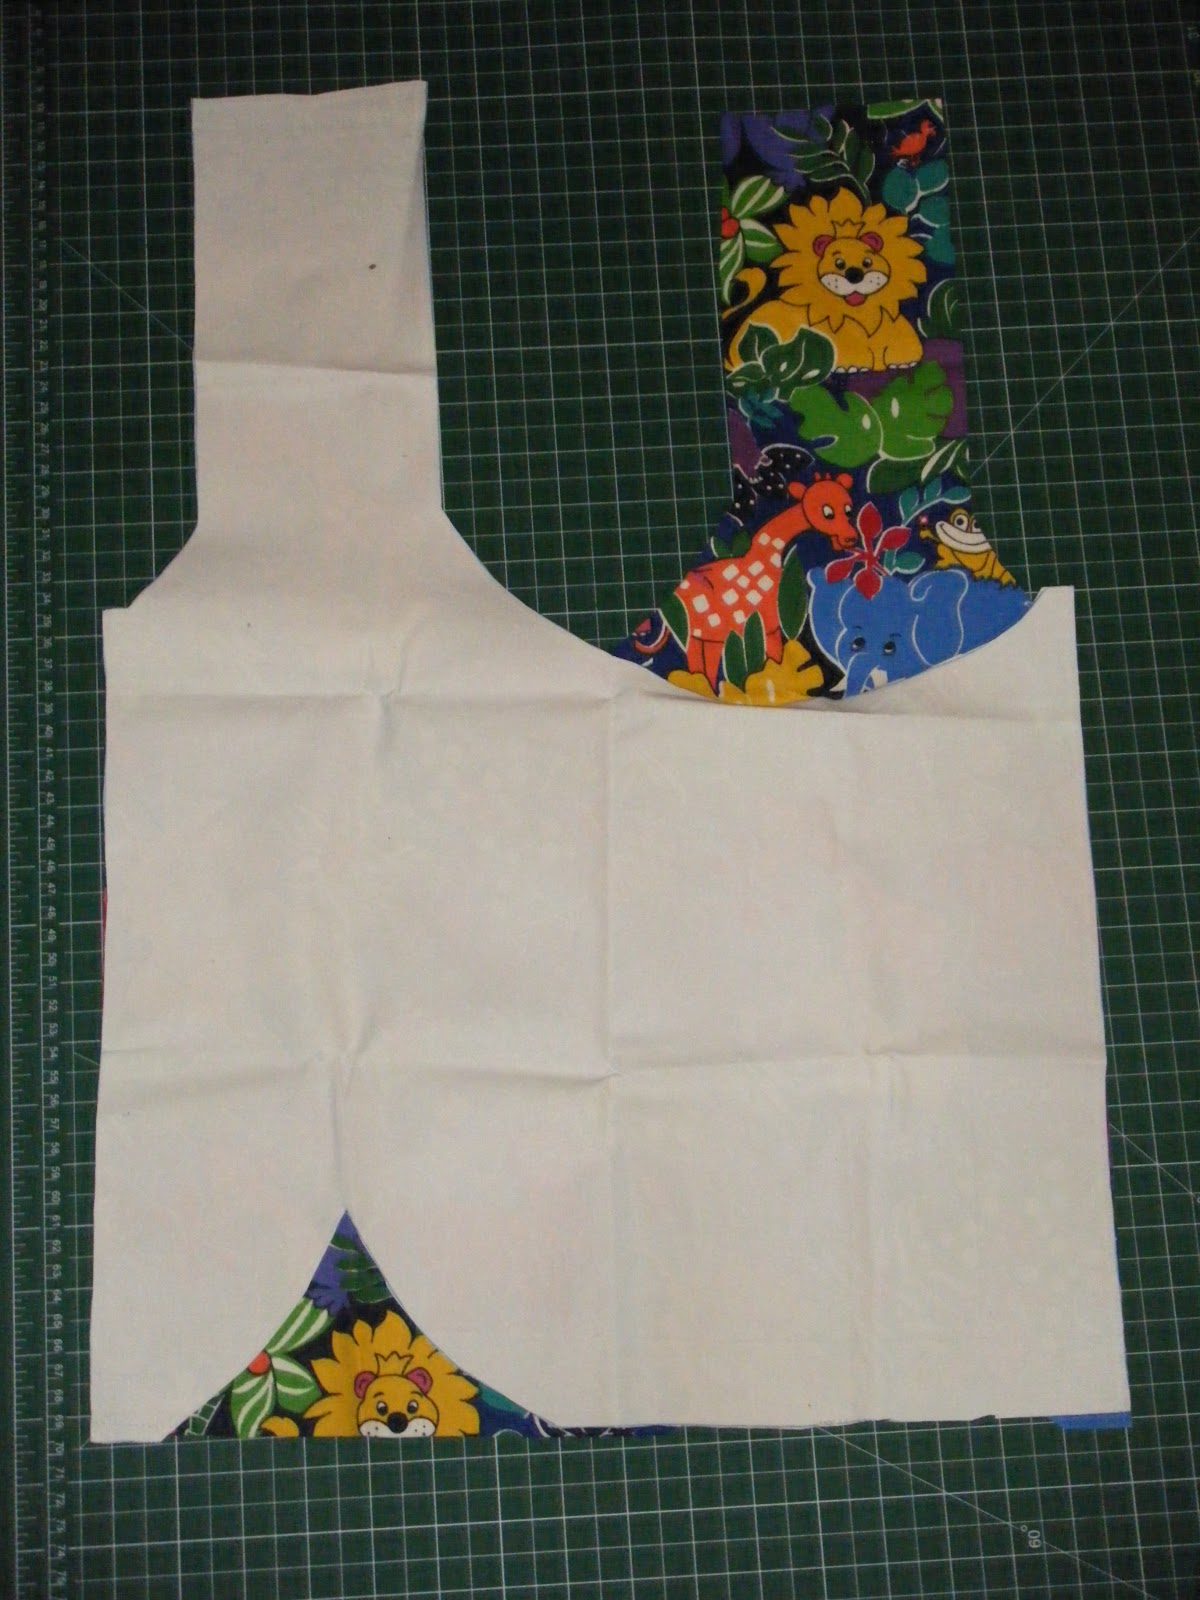 I flipped one over and matched the straight sides. This photo shows the shape of the piece pretty well.
Ok, now, see the little curvy triangle in that last pic, well to make the base seam you need to pick up the two curvy bits and match them together. I'm not sure how to explain it better. If you imagine a fold down the middle of the top rectangle-y part all the way down to the top of that curvy triangle, that is where to fold it together.


And there you have it. A quick bag which has helped to empty a teeny bit of my UFO stash.
If you like the look of this bag, I have a couple of nice versions for sale at the moment on my Facebook page. I also sell kits of this style with all the pieces pre-cut. It would make a nice gift for someone in either form. Just comment here or contact me on the Facebook page and let me know if you're interested.
I wonder what project I'll be working on tomorrow.
See you then!
Subscribe to:
Posts (Atom)